
Tips from the Bucket
A place to share various ideas and techniques
Halligan as a step
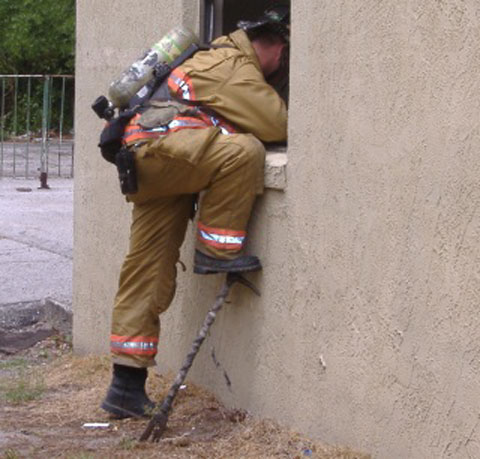
The Halligan Bar serves many purposes on the fire ground. One use outside of the normal forcible entry is use as a step to get us into taller windows such as windows found on many of your older style queens and shotguns. Note on the video it is critical that we clean the entire window frame to lessen the likelihood of being cut upon entry or egress.
Method of carrying Hook and Halligan
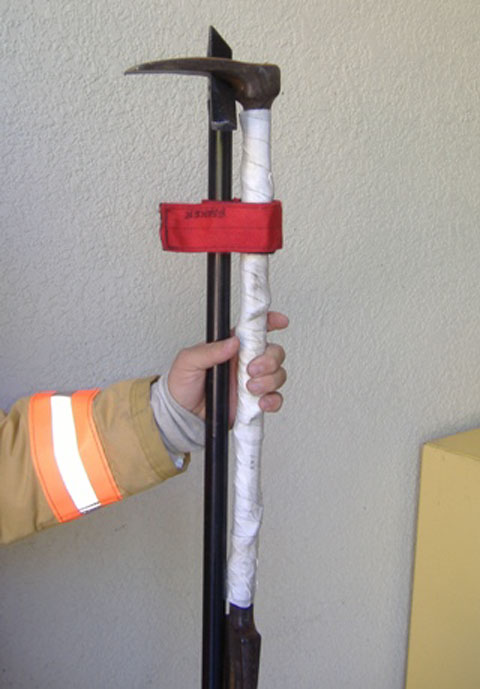
Any easy method of carrying a Hook and Halligan in one hand is pictured above. Place the adz of the Halligan over the hook and hold together with one hand. A velcro strap placed tightly around the two tools helps out significantly.
Halligan into roof
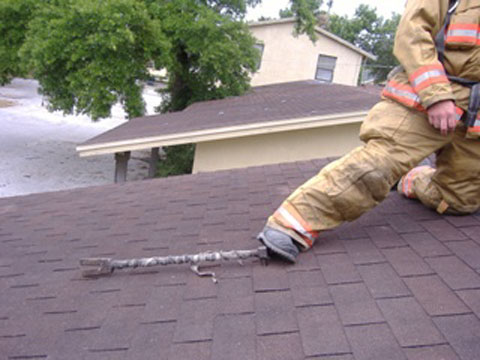
The Halligan placed pick end into the roof provides good
footing and leverage when working on peaked (or pitched) roofs. Anytime we
exceed a pitch greater than 4 / 12 roof ladders are a safer alternative.
Ladder carry with OVM Tools
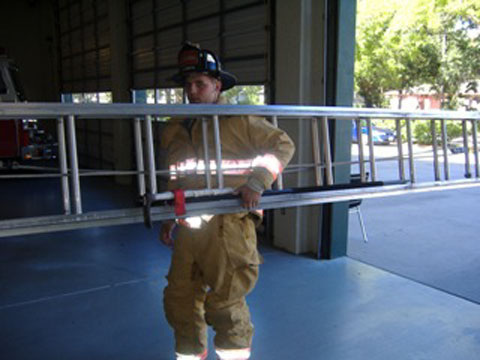
The Outside Vent Man (OVM) has to carry a bunch of tools one method of making it easier is pictured above. Carry the ladder with a low shoulder carry, place your hook and halligan on the bottom beam of the ladder, and clamp in place with your hand. Not visible is the cut sledge in the belt of the SCBA.
Halligan Saw Holder
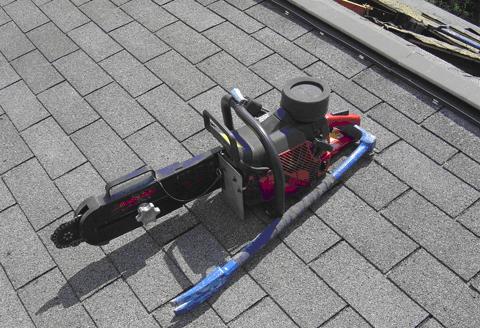
After making the cut you need to put the saw down in order to free up your hands to remove the cut section. Burry the pick end of the Halligan into the roof decking with the saw hanging from the adz. Don’t forget saws and equipment should be hung on the unburned side of the roof operations out of your means of egress, but close enough for access.
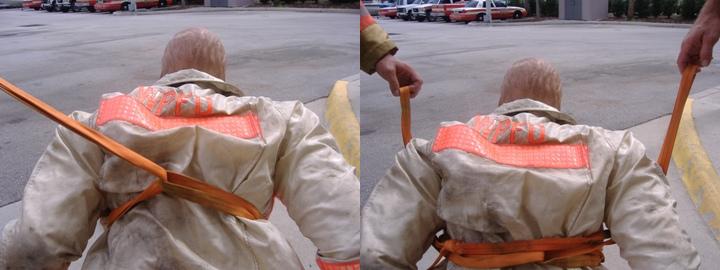
Webbing Storage
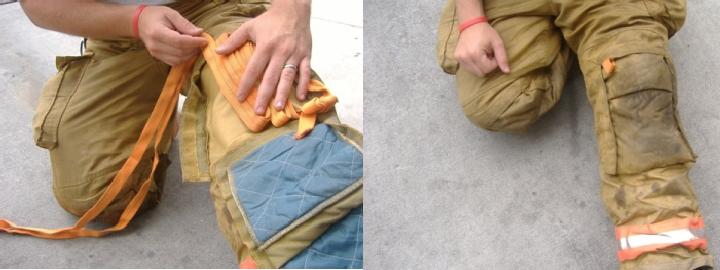
Webbing is an amazing tool for the fireground. Every firefighter should carry at least one 20 foot section. Check out some of the other tips that demonstrate the multiple uses of webbing. A good place to store a loop of webbing is in the removable kneepad in your bunker pants, it's easy to get to and really doesn't get in the way.
Hook & Webbing Step
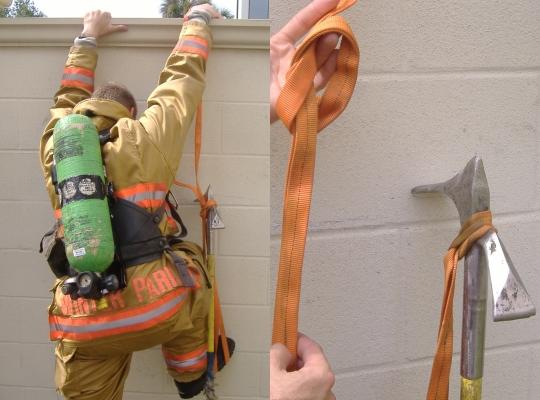
Your hook can also be converted into a step. This works well for a window that is too tall to reach with the Halligan step. This technique also works well when you have to get over a tall block-wall fence. The key to this technique is to get the hook set firmly into the ground and against the wall before climbing. While climbing, you can then use the top of the hook (as a step) for that little bit of extra leverage you may need to get you up and over. It is very important to stay in-line with the hook. If you kick sideways, the hook will slide. It may work better if the hook is flat against the wall, the hook in the pictures has a large D handle on the bottom so this position worked best. This method takes a lot of practice, and you are almost guaranteed to fall a few times. It's obviously not the preferred method, but it is another tool for the toolbox.
Take your 20 foot loop of webbing and form a girth hitch, or simple loop over the top of your hook. Make a dip in the webbing down to the level you would like the step to be (above left.) Tie a simple overhand knot back up at the tip of the hook and place over the hook (above right.) Take the slack of your webbing and hold in your hand as you scale the wall. This allows you to retrieve your hook with ease.
Hook & Prussik Step
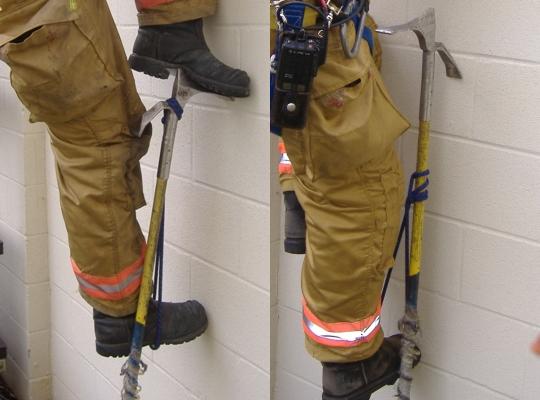
Start off with tying your prussik in a girth hitch over the top of your hook (above left.) Here you can also see the firefighter using the top of the hook as a step. The other method is to tie the prussik loop around the shaft of the hook with a two wrap prussik knot (above right.) This allows you to place your foot in the loop and advance the prussik as high as possible.
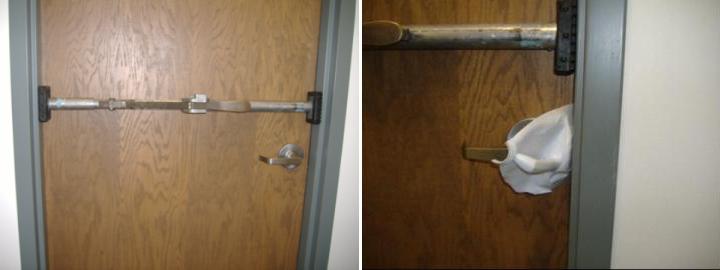
Wall Breach/Low Profile Training Prop
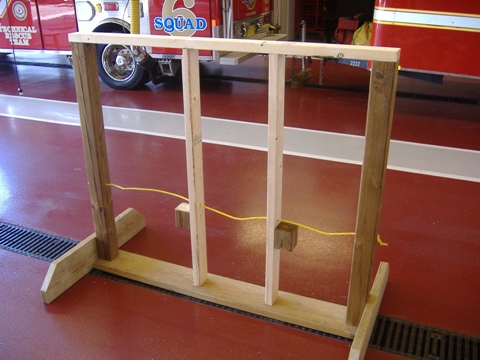
A wall breach/low profile training prop can be made quickly with a small amount of lumber. The prop pictured is 4 feet high and 5 feet wide, but any size will do. The two wall sections on the right are placed 16 inches on-center, and the one to the left is 24 inches on-center. A short piece of electrical wire is strung through holes drilled about 16 inches from the bottom. A 4 inch section of 4x4 is nailed to simulate an electrical outlet. We have found that a hurricane strap wrapped around the simulated electrical outlet and stud will prevent the outlet from being broken off. The 16 inch wall section with the electrical outlet obstruction is quite challenging.
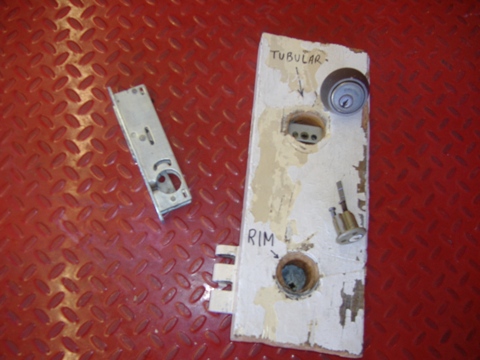
Through the Lock Training Prop
The best kind of props are free props! Lieutenant Rich Taylor from Winter Park Truck 61 came up with this great idea.
Find a structure in your area that is being demolished, and cut out a section of the door with the lock mechanisms still intact. (After obtaining the Demolition Company's permission, of course!) This section can be brought back to the firehouse and disassembled. This allows everyone to study the internal workings of different types of locks and mechanisms. In addition everyone can practice with the different key tools normally used in conjunction with the "A" or "K" tools.
The lock section pictured to the left was removed from a commercial door and can be be utilized in the same fashion. This lock is a little bit trickier to manipulate, normally requiring the 90 degree side of the key tool.
Framing Square Forcible Entry
Battalion Chief Tom Cole from Miami Dade Fire Rescue
sent in this great forcible entry method.
Click on this supplemental page for step by step instructions
on how to use a framing square as a forcible entry tool.
Spin Hitch
Firefighter Jeff Spinelli from Winter Park Firehouse 62 came
up with this method of using webbing to move a victim. This method is called the Spin Hitch for obvious reasons.
Start off with a loop of webbing and girth hitch it around the victim. (we found that it actually works better to make the girth on
the front instead of on the back like pictured below.) Make two bights out of the webbing and pull those bights
around the arms (pictured right.) Like previously mentioned these pictures are basically
backward, just picture the victim facing the opposite way. We found that this
method works well when moving up stairs, as it lets two firemen stand in front
of the victim pulling up and forward. It's hard to describe, and the pictures
certainly aren't doing it justice. It's best to go out and give a try.
"Doggy Door" Cut
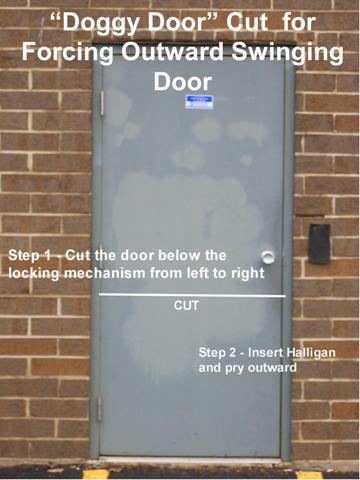
The photo above pictures the "Doggy Door" cut. Battalion Chief Jeff Pindelski from Downers Grove (IL) Fire Department sent in this idea.. BC Pindelski is also a co-author of the Delmar publication Rapid Intervention Company Operations (RICO.) He pointed out that the hinges remain an option on the outward swinging door, but this too could be very useful method. Once the bottom section is pried open a firefighter could reach or crawl in, and manipulate any security devices on the door. The beauty of this option is that most of the locks added to the door will be located above the midline. This option should make pretty quick work of forcing most doors.
A great place to use the doggy door would be a check cashing store. These stores have some interesting forcible entry and search issues associated with them. Check out the supplemental page for a full description and additional photos.
Halligan Cheater
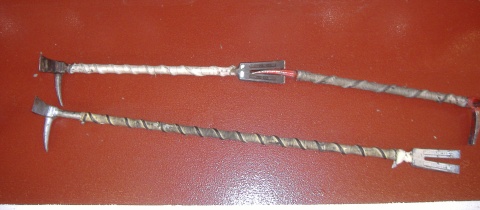
The Halligan is by far one of the most versatile tools on the fireground. There may be that rare occasion when the standard 30” Halligan just can’t get the job done. Trust me, it’s rare but it could happen. Pictured above is a commercially sold 54” Halligan. Personally I haven’t been faced with a situation that would make me carry it regularly, but it’s nice to know that it’s on the rig.
Another viable option is also pictured above. It involves using two Halligan’s simultaneously. It’s just like adding a cheater bar to the Halligan. When forcing an outward swinging door, place the first Halligan as usual. If more leverage is needed, place another Halligan’s forks into the first Halliagn’s forks. Now two people can easily apply force to the tool set. It’s helpful if one firefighter places a hand over the forks to keep them engaged. When you marry the two Halligan's in the same direction (as in picture above) the opposing pick will interfere with adz being able to “set” into jamb. You need to rotate the second Halligan 180* before marrying them. now the adz can be BURIED (as it should be) with the pick from second tool not getting in the way. It may look ugly but it gets the job done.
Ballance Point
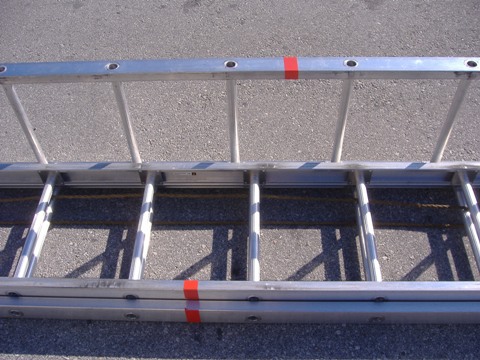
Here’s a real simple and effective time saver. Believe it or not it each ladder has a different balance point. For example, a roof ladder is not balanced exactly in the middle; the hooks add enough weight to affect the balance point. A simple stripe of paint or reflective tape at the balance point eliminates the guess work. Who wants to take the time to count rungs…Just place the mark on your shoulder and the ladder is perfectly balanced every time.
Pictured above is a 14 and a 24 placed next to each other, you can see in the photo that the 14’s balance point is closer to the tip due to the weight of the hooks.
Another tip is to use different colored stripes (or combination of stripes) for each unit. It’s easier to distinguish which ladder is which when multiple units have thrown ladders.
Two Jakes and the Jaws
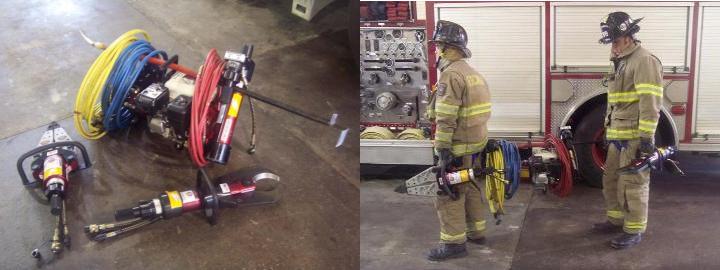
Firefighter Matt Scallan from Escambia County Engine 19 sent in an effective way to "work smarter, not harder." He was quick to share the credit with his brothers on Engine 19 "C" watch. He points out this method works well when manpower is be limited, time is of the essence, and of course you have a vehicle beyond the reach of pre-connected hydraulic reels.
Simply place you power unit on the ground and slide the six-foot roof hook through the handle (or frame depending on power unit.) Now you can place your coiled hoses on the hook. Each firefighter grabs a tool in one hand, and the hook in the other. The ram can be can be carried by the way of a sling or can hang from the hook like shown in the photo above.
Fernald Lock Pick
Jeff Janus from Bloomingdale Fire Protection District #1 sent in this tip for “forcing” a door during non-hazard situations. Apparently it’s called the Fernald lock pick, and involves a bleach bottle of all things. It seems to be best suited for doors with a rabbeted jamb, or a stop jab that you don't want to remove. Jeff pointed out that he didn't invent it, otherwise we'd be calling it the Janus Lock Pick. (He didn't say that part, we took creative liberty on that one.)
You’ll need a smoke ejector hanger and an empty bleach bottle.
Place the smoke ejector hanger bar in the door jamb. Either immediately above or below the lock. Extend the hanger, leaving one or two finger widths to the jamb before spreading the hanger. This seems to give it a good amount of spread. Expand the hander just enough to create a small gap between the door and jamb. Grab the empty bleach bottle that is cut into a hook shape. (Leaving the handle attached makes it easier to maneuver.) The bleach bottle is the part actually called the Fernald Lock Pick.
The pick is slid into the door jamb and moved around until it catches the door lock throw. And now you’re in!
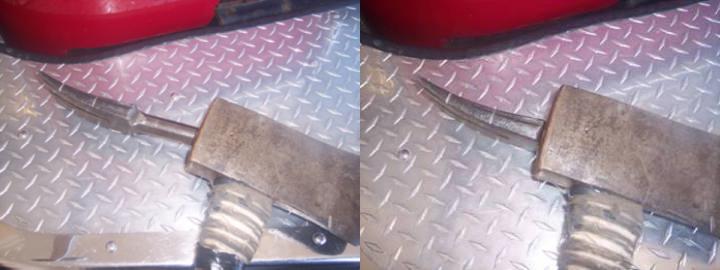
Modifying the Irons
Firefighter Matt Scallan from Escambia County Fire and Rescue, and Freighter John Gilkey from Montgomery County Fire/Rescue. They both sent in this tip within a few weeks of each other.
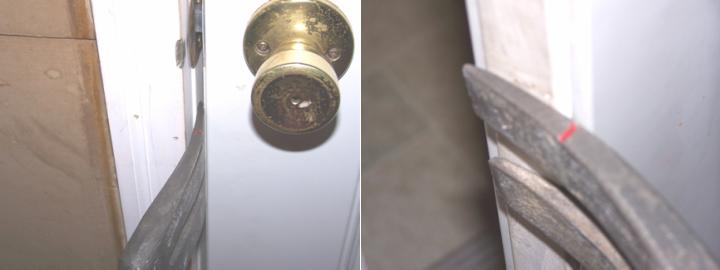
The First part of the tip involves marking the halligan. To remind yourself how far to set the bar, make a mark on the fork and adz of your halligan, 1 ½” (the width of most doors) from the edge. You can make the mark using a file, dye grinder, or Dremel tool. Firefighter Gilkey points out that a little paint gets you “style” points and you’re done. Anyone who has forced a number of doors is probably wondering why bother? Any seasoned fireman knows when the tool is set buy sound and feel. We agree, but we would like to have each one of you reflect back on your first few attempts in forcing doors. We’re sure each one of use could have used a little “visual” reminder.
Firefighter Scallan also sent in a photo of a modification to the fork end. This works well in narrow hallways where adequate room may not be available to strike the back of the halligan. The tip is to simply file or grind of the top of the forks to give a striking surface for your axe. Of course this method does not work so well on a fully taped up handle.
Hook & Ladder
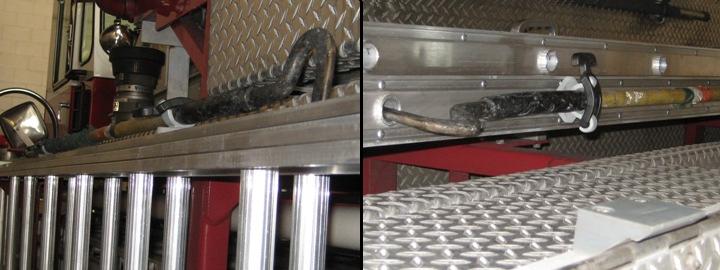
Emergency Vehicle Driver Dean Denning from Baltimore City Truck Company #5 sent in this slick method of storing & carrying the OVM tools. He graciously gave credit to Baltimore City Truck Company # 29 for the original idea.
This tip involves attaching 2 tool holders to the bed section of an extension ladder (or any ground ladder for that matter.) He points out that the long bolts were placed through the rungs of the fly section, thus maintaining the ladder's integrity by not drilling into the bed section. So the safety police can stand down… The hook in this case is a "Boston Rake" and the point end is stored in the rung, helping avoid injury.
He points out that by having a hook pre-attached to the ladder the firefighter has a free hand to take another tool. In addition, when the ladder is mounted on the side of the rig (with the tool pre-attached) scratches and gouges are less likely to occur. Since the firefighter can focus on taking the ladder and worry about the tool scratching the rig.
Tabbed Ground Pads
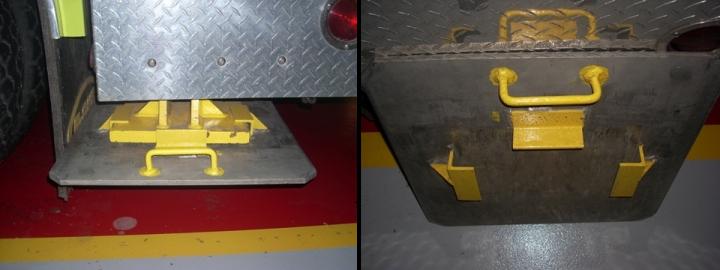
Lt. John Bannon sent in the latest Tip from the Bucket. He credits Walt Caber, President of the Reliance Hook & Ladder Co. 61 for the creation of this tip. They welded tabs on the ground pads (or jack plates depending on where you are from.) The tabs make it much easier to get the pads in the right place. Lt. Bannon pointed out that the pad can be slid on from the opposite direction in situations where the outrigger would have to be right up against an obstruction.
Obviously, any crew worth even being on the truck should be able to throw the pads in the right place every
time, but this tip is still quite useful. In a situation when manpower is limited, or if the truck crew breaks
into teams prior to the rig getting set up, the “tabbed” pads will make the setup much quicker.
Heavy Irons
Sometimes the axe and halligan just won’t do. The time may come that you need a bigger hammer. One of the issues with carrying
a sledge with a halligian, is the fact that they don’t marry as well as the traditional irons. Here are two similar approaches
to fixing the issue. The first one was sent in by Firefighter Angus Burns from Lexington Fire EC-3. The second one was sent in
by Driver/Operator Chad Berg from Snohomish County, Washington Ladder Co. 72.
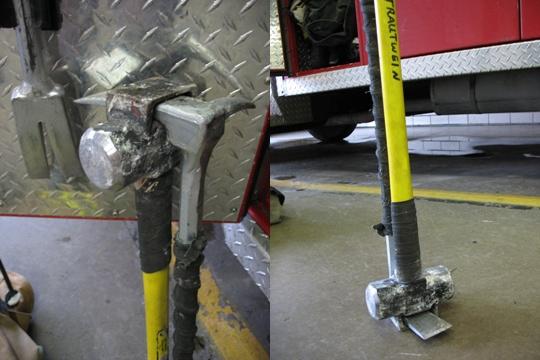
Angus points out that the Lexington creation was a group effort. Firefighter Jack Trautwein wanted the ability to carry the sledge/halligan combo, Angus found the material at a local fire apparatus shop, and Firefighter David Gumm did the machining and welding. This particular method has the added feature that allows the set of “heavy irons” to stand upright without falling over.
Chad took the more familiar approach. He used a more traditional loop welded onto the top of the sledge. He points out he likes
to carry the heavy irons when working in concrete tilt up and re-enforced masonry structures that normally offer little flex when
forcing. The heavier sledge allows for a bigger punch when setting the halligan. Since the welder was already out and warmed up,
they added a little company pride to the tool.
It should go without saying, but we’ll say it anyway. Be careful to watch the temperature of the sledge head while making these
modifications, you could weaken the epoxy bonding the handle and head, and we would not want to be around the first time you
figure it out.
Smoke on a Roll
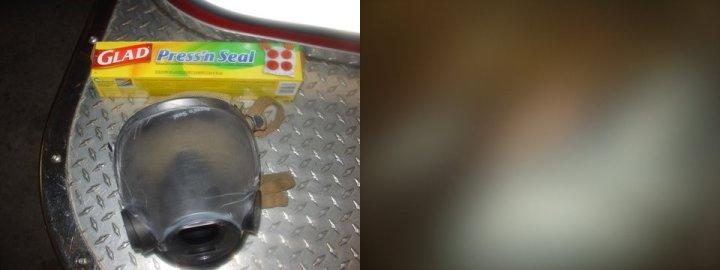
Here’s a quick and cheap way to “smoke up” someone’s mask for training. Firefighter Jason Zamarron from Grand Rapids Fire
sent in this great idea. He took some Glad Press-N-Seal cut it to size and stuck it on the outside of the mask. As you can
see in the second picture it gives a somewhat distorted smoke type of view. If a more obscured view is desired, a second piece
can be placed over the first. One great feature about this method is that it can be taken off the mask quickly when a call comes
in. This idea works well when the entire room can’t be smoked up due to time, logistics, or any other reason.
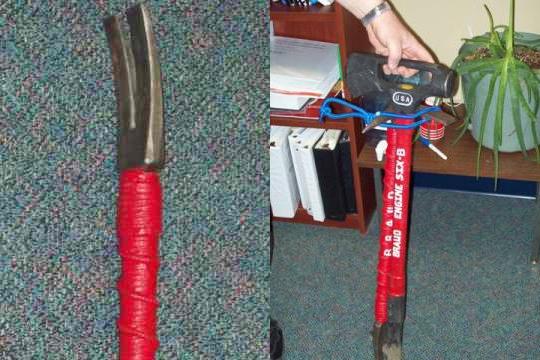
Dipped Irons
Scotty Shelton, Chief of Training for Baton Rouge Fire sent in this tip he spotted out on the training ground. The tip is actually
credited to Captain John Braud of Engine 6. He used 3/16 cord and tool dip to create a non-slip grip surface on his set of irons.
It’s cheap, easy, and makes the tools readily identifiable. The set of irons are held together with a bungee cord that can also be
used to hold back screen and storm doors.
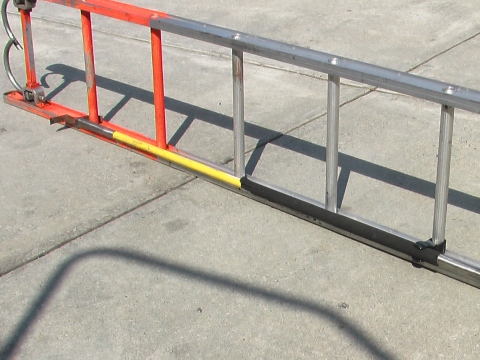
Better Balance Point

Firefighter Eric Bearss from Orlando (FL) Tower 7 sent in this idea for a better balance point. He pointed out that he picked this idea up while assisting Mike Caimpo (FDNY) at the annual Orlando Fire Conference with Champ’s Street Smart Ladders Class. Obviously, the main purpose behind the marking is to identify the balance point for each ladder. This larger marking serves multiple other purposes: easy equipment identification, and of course the ever important company pride (take a look at the fireground pics @ the station.) However, the most important aspect of this version of the balance point marking has to do with helping the outside team. In the instances when the outside team may be split up on the fireground, its obvious to the other team member exactly which ladder is yours, and exactly what room you are currently VESing (by leaving your hook on the ladder.) Another benefit of this marking is that if the balance point is painted on the base section, once the stick is thrown, it puts the unit ID right at eye level.
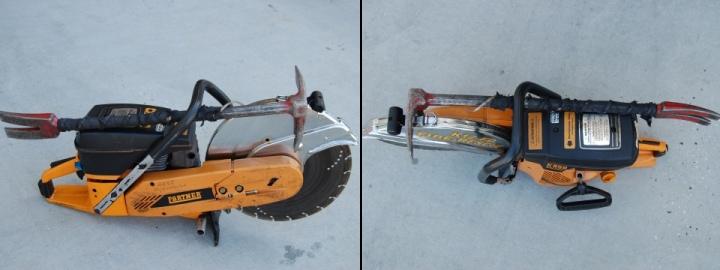
Saw Press
Captain William Foss Golder Ranch (AZ) Fire sent in this idea for a method of carrying the saw to the roof. They were trying to look for ways to save some of the precious floor space in the bucket. They started looking for a way to mount the saw outside of the platform when they were preparing to ventilate. (It is important to point out that the saw is only placed in the press when they arrive on scene and are about to deploy the aerial. During response and other operations, the saw resides in a traditional compartment.) After some research they found something called a “saw press” out of an outdoorsman magazine (could be found in most outdoor sports stores also.) The saw press was originally intended to be used on an ATV to transport a chain saw through rough terrain. They contacted the manufacturer and reviewed all of the specifications on their product, and felt comfortable that it could be adapted to this particular application.
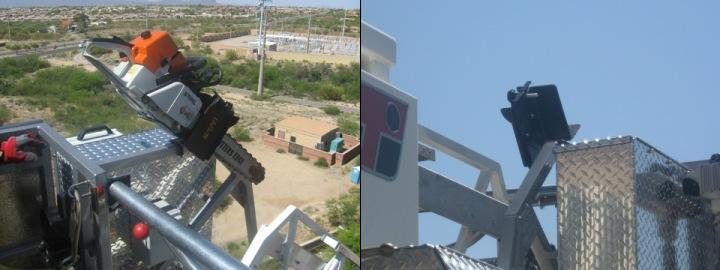
The photo to the left shows the saw mounted in the press, and the photo to the right shows the saw press in place without a saw, this is all that remains on the aerial when the press is not in use. After having it in place for some time, Capt Foss said they a very pleased with the outcome. The saw fits in quickly and is removed quickly even with your structure gloves.
Bar Cover
Firefighter John Gilkey from Montgomery County (MD) Fire, Station 29-A, sent in this tip. The tip is simply to use some old hose as a saw bar cover. A couple of short bolt, washer, nut assemblies, and you’re done. Of course a quick stencil and a rattle can finish it off nicely.
The photo on the right shows how the addition of some webbing and a plastic buckle can be used as a retention system. A quick easy way to protect the saw.
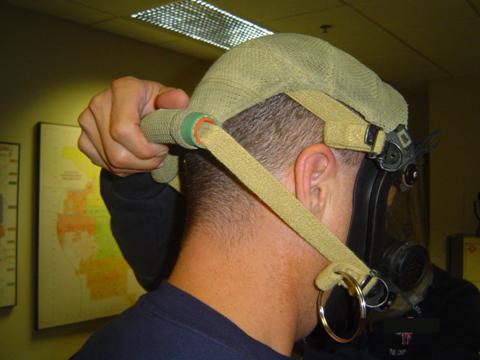
RIT Mask
The District of Columbia Fire Department is in the process of training the entire department in Rapid Intervention Team skills. One of the many skills covered is to replace a downed firefighter’s damaged or missing SCBA face piece. This somewhat simple skill becomes significantly complicated while wearing gloves in a low-vis environment. Some of the brothers knew there had to be a better way, so they came up with a simple, yet effective, modification to an old face piece. The information for this post was sent in by two individuals: Captain Daniel Troxell from Truck Company 6, and Lieutenant Tony Carroll from Rescue Co. 2. Click here to see the supplemental page with the details of this useful modification.
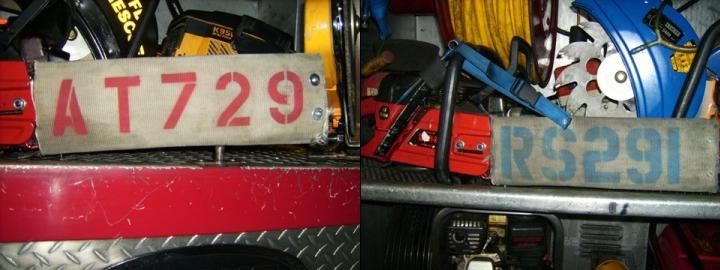
Twist Lock Higbee
Here is a helpful tip that makes a simple job even easier. Undoubtedly, every one of us has had to try multiple times to hook up a twist lock electrical connection. Common, admit it, not even at 03:30? …Thought so.
Ryan Skabroud from Chippewa (WI) Fire District sent in his rendition of an idea he originally learned from St. Paul Fire. The idea is to simply mark the odd prong on each connection. A few sharpie markers (black and silver) are all you need. Simply connect (but don’t twist) the plug and draw your mark on both the male and female ends of the plug. Then when its time to make the connection, just line up the marks, and you’ll have success first time, every time.
Aerial Saw Scabbard
Jake Portillo from Corona (CA) Fire Dept. Ladder 3 “B” sent in some photos of a tip without a bucket. Although you cannot really tell from the photo, Ladder 3 is a Tractor Drawn Tiller Aerial, obviously with no bucket. In order to simplify getting saws to the roof, Corona Fire Department created what they call the “Aerial Saw Scabbard”. Apparently the name has a funny, easy to remember abbreviation. Jake pointed out that they do not run with the saw in the A.S.S. Upon arrival, the cab fireman hands the saws up to the tillerman for placement in the scabbard. The scabbards do not have any retention straps; the angle of the scabbard keeps the saw in place. The scabbard is a simple bracket made from some diamond plate with a nylon insert to prevent damage. Notice the way the scabbard is mounted, the bolts do not go through the aerial at all. The bolts simply clamp the scabbard to the aerial. Jake also pointed out that they do in fact run with the rubbish hook stored on the aerial as seen in the first picture. The climb to the roof is much easier with two saws, and one hook already at the tip of the ladder, allowing the roof team to make it to the roof quicker, and with the ability to carry additional equipment.
RIT Mask 2
Lieutenant Doug Mullford from Lisle-Woodridge (IL) send in a slight modification to the DCFD RIT mask shown above. They took the piece of hose and
placed inside the webbing of the mask. The reasoning was they felt you could get a better grip on the webbing, and better be able to verify when the
mask and webbing were properly seated. Lieutenant Mullford also points out that this medication eliminates the need to do any sewing. It’s simply
another rendition of the outstanding idea originally presented by our DCFD brothers.
$2 Glove Dryer
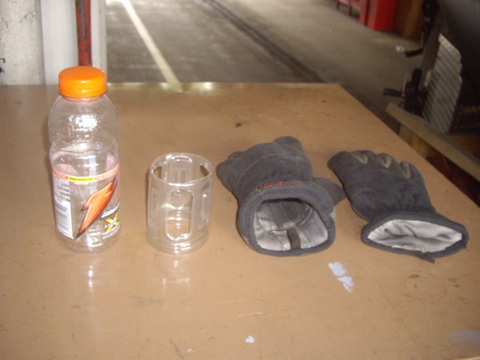
Tim Dowd from DCFD Rescue 2 sent in this simple idea to keep your gloves dry. Each one of us has gotten our gloves wet, and come back next tour to a set of gloves that smell so bad you never want to use them again. This idea takes 2 Gatorade bottles and two minutes of time. Simply cut the top and bottom off of the two bottles and cut every other section out on the sides. Slide these into your gloves and place in front of a heater or in you locker until next tour.
DC Hook & Ladder

Joe Brown from DCFD Truck Company 17 sent in this tip that works well for truck companies with side mounted ladders. It involves a webbing tension strap, a bull ring, a worm clamp, duct tape and some super glue (just kidding about the duct tape and super glue.) It’s actually a very slick method of mounting a hook to the ladder. It’s quick to install and uninstall on the ladder, and more importantly it’s very quick to deploy when the hook is needed. Joe and the Truck 17 crew have put a lot of thought into ensuring that this particular set-up improves their fireground efficiency, click here for the details of the set-up.
Elevator Key Organizer
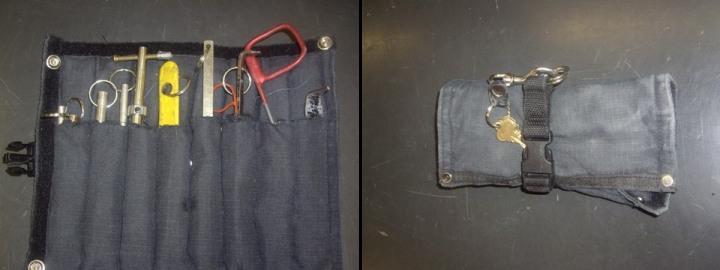
Lt. Ray McCormack from FDNY Ladder 28 sent in this method of organizing the set of elevator keys. Most rigs simply carry the elevator keys
exactly how they came from the supplier on a large ring. This large ring may work for keeping the keys together for storage on the rig, but
that is about it. Using the keys while they are on the ring is another story.
Ray’s method uses a pouch made from an old removable bunker gear
knee pad. The Morning Pride knee pads used here already had the ridges (compartments) sewn in them, so a simple cut with a razor knife was all
that it took. As you can see a small strap with clip holds the roll together.
Non-Rotating Saws
John Simpson from Osceola County (FL) Truck 72 sent in this tip to use while performing your daily equipment check. Saws have a natural tendency to bounce and rotate when idling on the ground. This is caused by the vibration of the motor. Most saws have a foot stand or plate in-between the blade and motor. In order to keep the saw in one place, simply find a crack in the asphalt or concrete and place the foot stand in the crack. This keeps the saw in one spot when idling during checkout.
As a side note, simply letting the saw run at idle is not a sufficient morning check out. This tip is intended to be used when you are letting the saws idle after they have actually been checked.
Personal Escape Hook
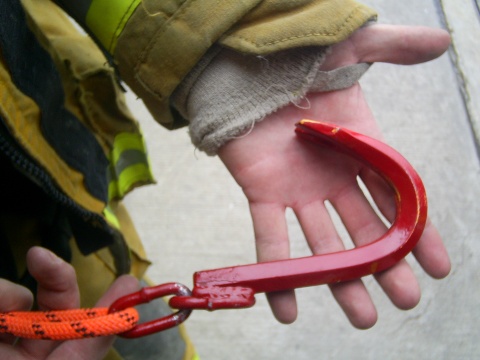
Engineer Jason Simms from Gwinnett County (GA) sent in this tip. He bought a small crow bar at the local home improvement store and cut it off at about 5 inches. He then welded two links of a chain to create an attachment point for personal escape rope. Jason says it works great and is quite a bit cheaper than the commercially sold products. The whole set-up was less than ten bucks. There’s nothing like a little firehouse ingenuity to save a few dollars.
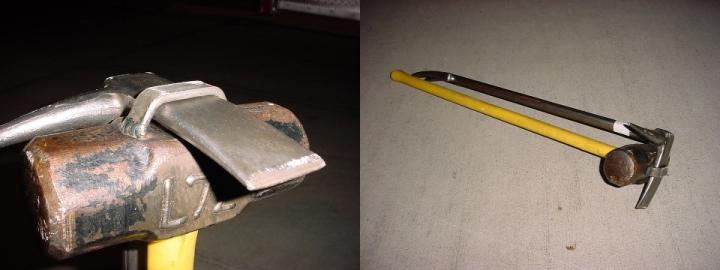
Free Hand
Paul Ashton from Winter Park (FL) Truck 61 came up with this tool carrying method. This particular method allows for two tools (halligan and rotary saw) to be carried with only one hand. The halligan is put in place by simply placing the adz on top of the blade guard with the pike along the side of the guard. The handle of the halligan then rests on top of the saw motor housing. The vibration springs on the handle hold enough downward pressure on the halligan to hold it in place. As mentioned earlier this method works well when carrying the saw by hand and will not work with a saw slung over the shoulder. There are many situations when a rotary saw and a halligan are needed together, this method frees up a hand to carry other tools. It may not work with different brands of saws, but works well with the Partner 950/960 series as shown in the photos.
Compartmentalized Ladder
Technician Larry Lippincott from Loudoun County (VA) Tower Ladder 611 sent in this tip that allows for ladders stored in a ladder compartment to be modified to securly hold a hook in place. This solution uses a simple clip and some heavy duty Velcro. The clip is simply attached to the rung using the Velcro.

This allows the clip to swivel out of the way when the ladder is stored and not in use, as shown above left. When needed, the clip can be swiveled into position allowing it to hold the hook securely in place, as shown above right. The clip is secure enough that it holds the tool while throwing the ladder allowing the tool to be released with a good pull. It is worth pointing out that this method utilizes the side of the hook with the 45 degree angle to help keep the hook secured to the rung.
Click here to submit your tips