
Training Props
Thru-the-Lock Prop
Ryan Royal from Colorado Springs (CO) Firehouse 8 sent in some ideas for a training prop that he and the crew at Firehouse 8 recently completed. Thru-the-lock tactics have become a quickly dying tactic, one that he had interest in but found few people to teach it and no good way to practice it. Thus the Thru-the-lock prop was born. Ryan scavenged a door and various locks and parts from buildings that were being demolished in the area.
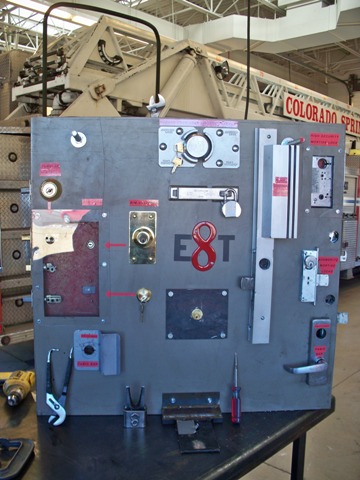
The front of the door prop allows you to see many different ways a door lock could present on the exterior of both commercial and residential buildings. The main categories of locks are the tubular deadbolts and the rim locks you see on the left followed by the commercial mortise locks seen on the right. There is at least one intact lock of each kind to demonstrate what it will look like before you pull it. The plexi-glass below is covering the many different mechanisms you will find after pulling the tubular deadbolt or rim locks. The right side of the prop has your typical store front door mortise locks. In addition, there is a small section of an aluminum storefront door allowing you to see exactly how you will find these locks mounted.
The two door handles with locks on the bottom right and left are what you find for panic bar hardware and locks. At the top center is an American Hockey Puck lock because of the special concerns and cutting techniques they may require. Below the American lock is a typical foreign made case hardened padlock. This was put on to show the simple and quick tactic of pulling the keyway on these locks with only a screwdriver. In the center of the prop you see a lock cylinder mounted with a piece of steel mounted behind it. This is the lock that you can actually pull to become more familiar with your tools. This lock is held on by a pair of visible in the next photo. The vise grips allow for pressure adjustments to simulate different mounting hardware on these locks. This lock can be pulled hundreds of times with no damage to your prop. Of course they had to finish it off with a little company pride for the Engine and Truck at the 8 house.
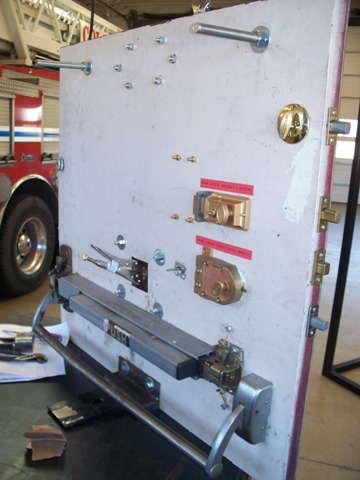
The back side of the prop shows the inside components of each lock. You can also see the vise grips holding the removable lock cylinder as mentioned above.
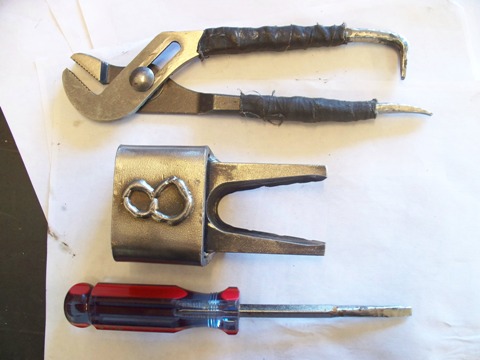
These three tools are the main tools used on the prop; they keep an extra set of tools with the prop for training. Typical modified channel locks used to manipulate each lock on the prop, a modified Rex tool (described below,) and a ground down and sharpened screw driver.
The modified Rex tool can pull the mortise, rim and tubular deadbolt locks. The modification was made by cutting the head off a Rex tool and welding a steel band to allow it to be used with the Halligan (similar to the K-tool.) This modification offers much more leverage because of the length of the Halligan and can me kept in your pocket making it more readily available to perform a through the lock entry.
Cut Prop

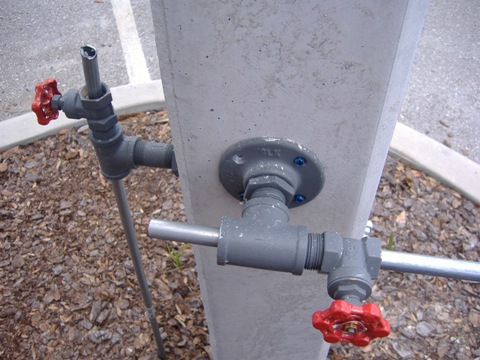
This cut station is a simple prop that can be made for less than $100. The prop simulates cutting window security bars, allowing practice using the rotary saw at different heights and in different positions. As shown in the picture below, the prop was made from galvanized pipe fittings that are available at the local hardware store. Each “clamp” is made from a flange, two short sections of threaded pipe, a Tee, and an inline valve. Although ½” fittings may work it is suggested to use ¾” instead, giving you more flexibility in the material you use to cut. The assembly is then used to clamp rebar, or Electrical Metallic Tubing (EMT.) Ideally the clamps would be screwed into the building at windows height. In these pictures, the clamps were simply screwed into a concrete light pole. Either way, it’s an effective prop that can be made relatively cheap in a less than an hour.
Cut Prop 2
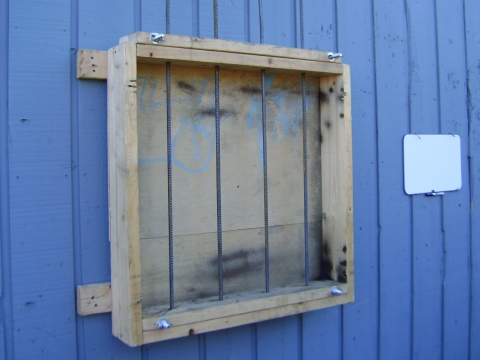
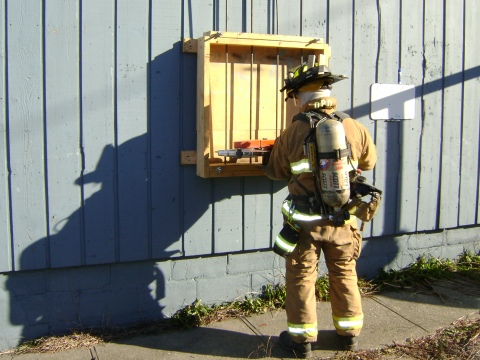
Here’s another great idea for a cut prop. This prop was sent in by Lieutenant Jeff Pacia from North Providence (RI) Engine 1. The prop is build out of 2x6 lumber and can be mounted to a building as shown. The prop measures 4ft x 4ft but could be made whatever size you need. Once the box is made, it is backed with a sheet of plywood for stability and two 5ft long 2x4’s are used to mount the prop to the building. The top and bottom 2x6’s have ½ holes drilled in them about every 8 inches to accept the rebar. The clamps are made from two 4ft long 2x6’s are ripped in half using a table saw. These ripped boards have holes drilled on either end to accept 8” carriage bolts with wing nuts with washers. Each clamp assembly rests on top of one of the horizontal 2x6’s. The rebar is fed in from the top and clamped in place. If just the bottom portion of the rebar is cut, the clamps can be loosened and rebar lowered and re-clamped. The same set-up (clamps and holes) could be repeated on the sides of the “window” if horizontal bars are desired. It's all about getting the saw in peoples hands, and actually using it for real. Starting the saw and watching it idle on the ground is not training!
Click here to submit your training prop